Table of Contents
This chapter will explain how to download the source code, install the software, and do run a test.
Requirements
Before starting, you must have Borland C++ Builder 6 or more recent because the operator and most application modules rely on the Borland VCL library. If you do not have it, you will have to get it somehow. This also means that you will have to use Windows XP, as it is the only operating system that supports Borland C++ Builder. In the future (no date announced), BCI2000 should be platform independent (ref). You will also need some knowledge of C++, since everything will be coded in that language. Fortunately, if you are not comfortable with it, it is easy to find documentation and tutorials.
Download
The first step is of course to download the source code. For that you will need a login and password that will be granted to you freely (after you fill a legal form) if you are part of a research institute or university. Just head on the main download page and follow the instructions. If your supervisor (or someone else) already has an account, he should be able to give you access to the source code.
The source code is then accessible via Subversion (SVN). It is a version manager for projects, so people working on the same project can modify different parts without having to count them, or inform the others of the changes. It is a successor to Concurrent Versions System (CVS). The wiki explains how to download and use TortoiseSVN in case you do not have a SVN client and then how to set up your client to download the source code.
Once you have downloaded the source code, you should have a folder with these contents:
- batch - Contains instructions for batch demonstrations.
- data - Contains data samples.
- doc - Contains the BCI2000 wiki in full.
- parms - Contains examples of parameter files, which are saved configurations (see this section).
- prog - Contains all compiled modules. And the default folder where your compiled modules will be saved.
- src - Contains the source code.
- buildutils - Command line utilities for compilation (mostly formatting)
- contrib - Contains all the modules developed by third parties (that means you should save your work in here).
- AppConnectorApplication
- Application - For application modules
- SignalProcessing - for signal processing modules
- SignalSource - for acquisition modules
- Tools
- core - Contains all the modules developed by BCI2000. It also has the source code for the launcher and the operator. It contains basically the same folders as contrib, to keep the modules organized by role.
- doc - Documentation creation files.
- extlib - Contains all external libraries (.lib files).
- shared - Contains all the code files that are meant to be used by modules. They are sorted by use (types, modules, fileio, bcistream, etc…). Most filters are here (under modules) so as to be available to more than one signal processing module or application. All the super-classes are here too (GenericFilter, ApplicationBase, etc…).
- tools - Contains miscellaneous tools.
- BCI2000_Help.
- GettingStarted.
This list omits most subfolders because they are either explicit or empty.
Installation
I recommend copying the “src”, “prog” and “tools” folders to another location, so as not to risk problems in case you choose to update your files with SVN. Updating the project may change more than you expect and force you too modify your code to fit the new protocol. When you compile the different modules, the executable will be created in the “prog” folder.
The next step is to install the acquisition module for Biosemi's Active2. If you do not plan on using this, you will have to find out how to install your hardware's module on your own. Start by checking the contributions page of the wiki.
Bisoemi2ADC is part of the BCI2000 source code you have downloaded in the previous step. You can find it in the “src/contrib/SignalSource/Biosemi” directory. There you will find a file named “Labview\_DLL.dll”. You must copy it to the “prog” folder.
Now that everything is installed, you are ready to test BCI2000.
General Architecture
The BCI2000 operator is the coordinator of the different modules, as shown in the following figure.
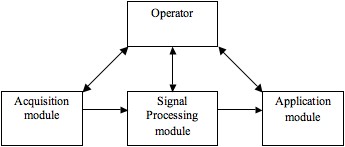
This diagram also shows the communication flow between each of the three modules. The acquisition module is the interface with the hardware you are using to record the physiological signals. Its purpose is to convert the signals into a communication package that the next module will understand, following the BCI2000 protocol. The signal is sampled at a chosen rate and passed on as blocks of a chosen size. For more information on the package architecture, see the wiki page.
The signal processing module processes each sample block to compute a new ouput vector that the application module can use as input.
BCI Launcher setup and test
With all that, we can start compiling.
Launch Borland C++ Builder and open the project named “BCI2000” in the “src” folder. Then choose “Project” → “make all projects” from the top menu bar. This can take quite a while (10-15 minutes, depending on your computer).
After that, try launching BCI2000 by double-clicking the “BCI2000launcher” icon in the “prog” folder. You find yourself with a window that has four compartments in the top half (see following figure).
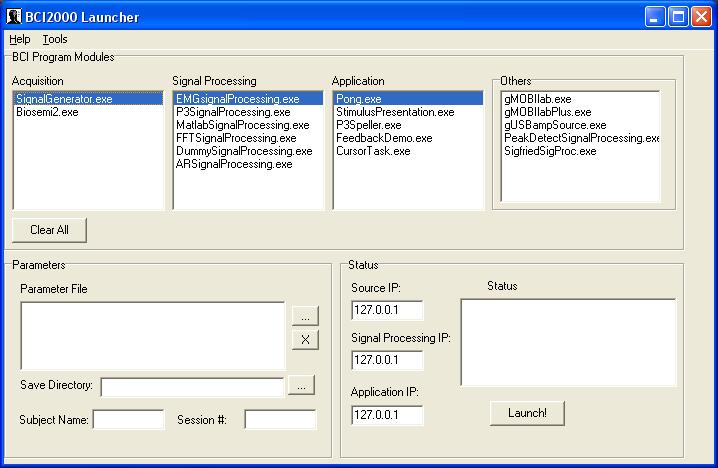
You will have to put some order in the list of programs under “others” on the far right. Select any and right-clic it. You will have the option of moving it to Source, Signal Processing, or Application. For now, you can just place SignalGenerator under Source, the DummySignalProcessing under Signal Processing and the FeedbackDemo under Application.
The bottom half of the window has two regions. The left part (“Parameters”) enables you to load a parameter file before launching. This will be explained below. On the right, you can enter the IP address of the computer hosting each module. By default, all modules are on the same computer, so the IP is 127.0.0.1, for localhost. If you want to divide the modules among two or three computers, this is where you define their location, so the operator knows where to access them.
Select one module of each role (acquisition, processing, application) and clic launch to set them up in a chain. You will always have to select exactly one module of each when launching BCI2000.
Now you have another this window:
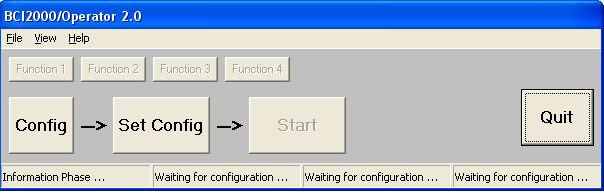
Clic “Config” to bring up the configuration options (see next figure). These are all defined by the three modules you have selected. Each module has its own set of options (or parameters). The parameters are divided under different thumbnails, depending on their definition. For instance, the parameters for visualization (mostly booleans for “visualize …filter output”) are under the “Visualize” thumbnail, while filter parameters are all under “Filtering”, in different sections.
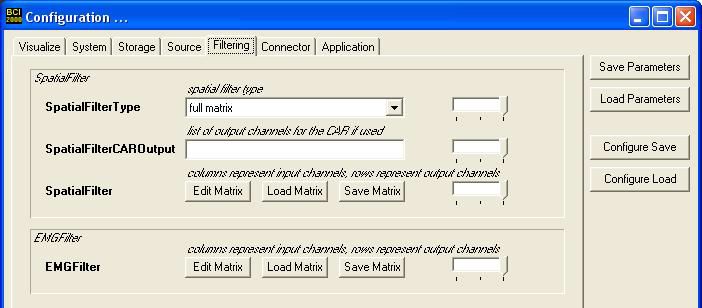
Each time you close the operator, the configuration is lost, so be sure to save any configuration you are happy with. The saved configuration file is then loadable from the configuration window, or beforehand in the “Parameter File” box of the BCI2000 launcher.
Now close the configuration window. If you clic on “Set Config”, you will see the application screen appear, as well as different windows. You can then clic “Start” to launch the acquisiton, signal processing and application modules.
You can also start the different modules manually with the command prompt by simply calling the “start” command followed by the name of the module and its IP. You must always start with the operator though; “start operat.exe”. You can also write a batch file. Some examples are in the “batch” folder.
If everything went well, we can start working on the code. If not, it is possible that your revision (the version of BCI2000 you have downloaded) is not completely functional. Posting in the forum will surely get you the answer to your problem, but do not forget to check the wiki beforehand.